Create an Ethernet Switch/Bridge
This activity configures the r1 VM as an Ethernet switch (aka. multi-port bridge) by adding additional Ethernet interfaces and creating a logical "Bridge" between them.
This 'switch' is placed in a network hierarchy and traffic is observed passing 'through' the switch.
Deliverable
Steps
Step 1
- Ensure you have completed the Project Setup activity and that you can access r1 and r2 from the host.
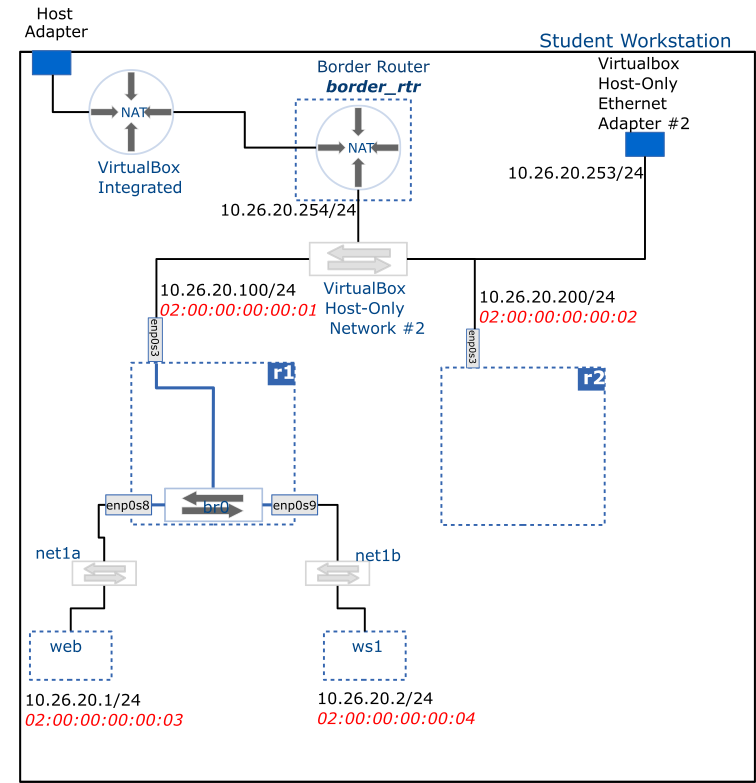
- Configure two more Ethernet adapters on r1 as follows (power off the VM before applying the changes):
- Adapter 2: connected to an Internal Network:
net1a - Adapter 3: connected to an Internal Network:
net1b
- Adapter 2: connected to an Internal Network:
- These interfaces will use the Paravirtualized Network (virtio-net) Adapter Type and have Promiscuous Mode set to Allow All
Note
These adapters will be named enp0s8 and enp0s9 respectively (see Red Hat interface naming conventions below)
Important
Once we have configured the bridge, the two internal networks (net1a and net1b) together with the Host-Only network #2 will be joined into a single broadcast domain.
Step 2
Note
You will complete the following tasks using the nmtui tool.
You can also use the command line version, nmcli (see nmcli command reference below)
- Delete any existing connections (aka configurations)
- Create a connection for the bridge
br0 - Create a connections for each of the slave interfaces:
enp0s3,enp0s8,enp0s9, adding them as ports to thebr0 - Enable autoconnection of the slave interfaces on the bridge connection
- Reload the bridge configuration
- (Optionally) Set
br0's IP via DHCP:
dhclient br0 –v
(the -v option suppresses errors)
Note
The IP address assigned to the br0 is used solely for administration of the machine, i.e. in order to connect r1 via SSH (for example, if we need to transfer files). A bridge doesn't require an IP Address to function as a bridge.
Tip
Explore your bridge
- Show your interfaces (r1)
ip link show - ensure that r1's physical interfaces are now managed by the bridge
- Show bridge state:
bridge link show - ensure all bridge ports are in forwarding state
- Show the forwarding table:
bridge fdb show | grep -v permanent - are there any MAC addresses you recognize?
Step 3
- Clone a new VM named web (linked clone, reset MAC address) from the centos_8_base VM and configure its Network
Adapter 1as follows:- Connected to Internal Networking –
net1anetwork - MAC address: 02:00:00:00:00:03
- Connected to Internal Networking –
- Clone another VM named ws1 (workstation 1) as above and configure its Network
Adapter 1as follows:- Connected to Internal Networking –
net1bnetwork - MAC address: 02:00:00:00:00:04
- Connected to Internal Networking –
- Start the web and ws1 VM’s and find out their IP addresses using the
ipcommand. - Ensure you are able to ping ws1 from web and vice versa. You should also be able to ping r1, r2 and the host from both web and ws1.
Tip
nmcli command reference
You can achieve everything we did above on the command line using the commands below (sometimes using the command line is faster, but it takes getting used to):
Connection/Configuration management:
- Show connections:
nmcli connection show - Delete connection:
nmcli connection del connection_name - Bring up connection:
nmcli connection up connection_name
Bridge management:
- Create bridge:
nmcli con add type bridge con-name connection_name ifname bridge_name - Add link to bridge:
nmcli con add type ethernet slave-type bridge con-name connection_name ifname interface_name master bridge_name - Activate ports when bridge activated:
nmcli con modify bridge_name connection.autoconnect-slaves 1 - Bring up bridge:
nmcli con up bridge_name