Packet filtering & NAT
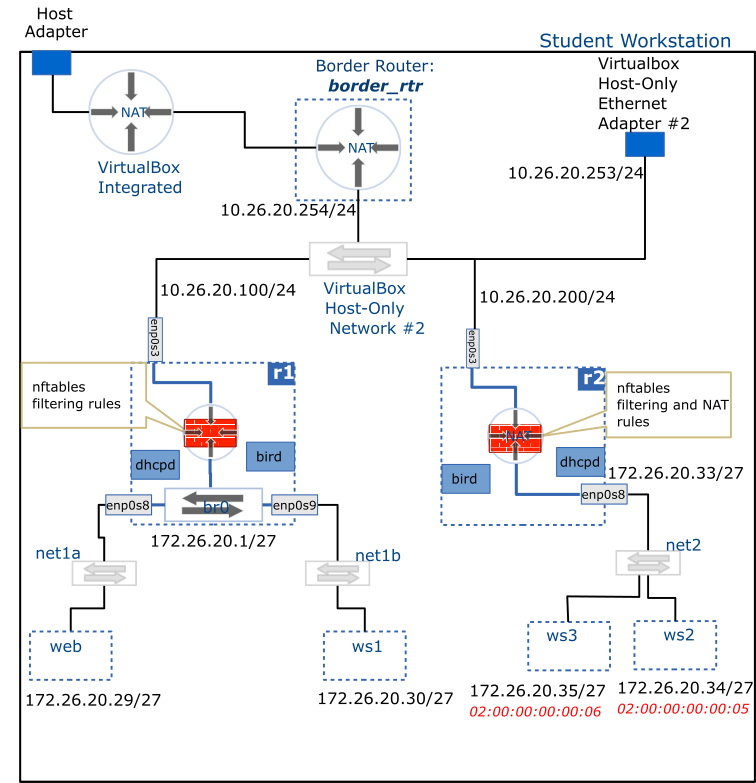
In this activity we configure the r1 router to perform packet filtering on all traffic between the Host-only Network #2 and net1. In other words, all traffic to and from net1 will now have to go through a Netfilter firewall.
We also use Netfilter to configure the r2 router to perform Network Address Translation (NAT, including port forwarding) on all traffic between the Host-only Network #2 and net2.
Deliverable
Setup
nftables - Firewall
nftables firewall will be implemented in r1 with the following rules:
- Allow all traffic into the loopback adapter of the router
- By default, deny all traffic entering the router
- Allow incoming
ssh,ospf,dnsandicmptraffic into the router when it enters through theenp0s3interface. - Allow all traffic originating from net1 network
- Allow all return traffic into the router
- By default, deny all traffic into the net1 network
- Allow
icmptraffic into the net1 network from anywhere - Allow incoming
ssh,httpandhttpstraffic into web - Allow incoming
sshtraffic into ws1 - Allow all return traffic into net1
nftables - NAT
Network Address Translation (NAT) will be implemented in r2 using nftables.
Private network
A network placed behind a NAT router should not be directly accessible from outside unless port forwarding is in place. Therefore, the bird.service on r2 will need to be reconfigured NOT to publish the internal network status (i.e. remove the enp0s8 interface from the ospf configuration block on r2).
The NAT configuration should provide the following functions:
- Translate all traffic coming from net2 so that it appears to originate from the IP of
enp0s3on r2 - Forward traffic arriving on
enp0s3addressed to r2'senp0s3IP with destination port 52022 and translate it so it is addressed to ws2 on port 22 - Forward traffic arriving on
enp0s3addressed to r2'senp0s3IP with destination port 53022 and translate it so it is addressed to ws3 on port 22 - Allow all return traffic into net2
- You will be able to login remotely from your workstation to ws2, and ws3 using r2's IP address on ports 52022 and 53022 respectively (you may optionally add login credentials for ws2 and ws3 to your host's
~/.ssh/config) - You should be able to access the internet (e.g. ping) from ws2 and ws3.
- You should NOT be able to access ws2 and ws3 directly using their respective private IP addresses.
Configuration steps
Both the firewall and NAT configuration go into the /etc/sysconfig/nftables.conf file.
- Edit the configuration file
- Validate the configuration file to ensure it contains no syntax errors
- Enable and run the service using
systemd. The service's name isnftables.service
Troubleshooting
- To verify that your configuration is correct, run the following:
sudo nft -cf /etc/sysconfig/nftables.conf
No output means your configuration has no syntax errors. If errors are shown, fix them and repeat until validation passes.
You can use nmap to verify that your firewall is letting in only permitted traffic. Run the following from anywhere in your network to verify that only ssh, http and https ports are open on web:
sudo nmap -n -sS 172.16.1.29
After configuration NAT in r2, verify that you are able to login remotely into either ws2 or ws3 from your host.
The ssh command takes a -p option for specifying a port for the connection. For example, you can login into ws2 like so:
ssh admin@10.26.20.200 -p 52022
Port forwarding
Note that were are using r2's address instead of that of ws2. This is because access to ws2 is allowed only through the port we configured through port forwarding.
If you managed to login successfully, you may proceed to adding an entry for ws2 to your host's ~/.ssh/config. In addition to specifying the hostname, username and access key, you will also need to provide the port to connect to:
host ws2
        Hostname 10.26.20.200
        Port 52022
        User admin
        IdentityFile ~/.ssh/acit_admin_id_rsa