DHCP Server
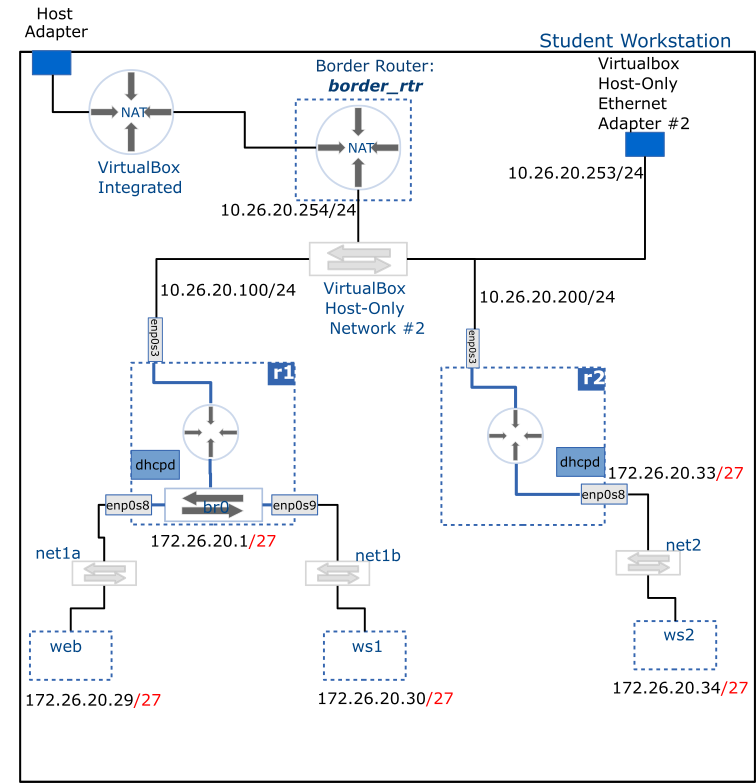
This activity configures a DHCP service in r1 and r2 which will handle IP configuration requests from net1 and net2 subnets respectively.
When completed, hosts within net1 and net2 subnets (web, ws1, ws2) will have their network settings configured dynamically via DHCP.
Deliverable
Setup
Ensure web, ws1 and ws2 are configured to obtain their IPv4 configuration dynamically; i.e. remove their statically assigned IPv4 addresses and set their configuration method to be automatic.
You will need to use the nmtui tool to achieve this.
Configuration steps
In general, there are three steps involved in provisioning a service on Linux:
- Edit configuration file (typically located under the
/etc/directory) - Validate configuration file - check for any syntax errors
- Enable and start the service - often by leveraging the
systemdframework
Edit configuration file
The dhcpd service listens to requests based on the subnets declarations inside the /etc/kea/kea-dhcp4.conf file. In both r1 and r2, find this file and open it using your preferred text editor, and add configuration options to allocate addresses as described in the diagram.
An example configuration is given below (this is only an example; your configuration must use the IP subnets specified in the diagram):
Example kea-dhcp4.conf file
# /etc/kea/kea-dhcp4.conf

{
  "Dhcp4": {
        "interfaces-config": {
          "interfaces": ["enp0s8"]
        },
        "option-data": [
          {
            "name": "domain-name-servers",
            "data": "10.26.20.254, 8.8.8.8, 1.1.1.1"
          }
        ],
        "subnet4": [
          {
            "id": 1,
            "subnet": "10.0.2.0/24",
            "pools": [
              {
                "pool": "10.0.2.100-10.0.2.199"
              }
            ],
            "reservations": [ # for fixed host IP allocations
              {
                "hw-address": "d2:d1:de:ed:ff:1f",
                "ip-address": "10.0.2.10"
              }
            ],
            "option-data": [
              {
                "name": "routers",
                "data": "10.0.2.1"
              }
            ]
          }
        ]
  }
}
Enable and start the service
- Check syntax errors:
sudo kea-dhcp4 -t /etc/kea/kea-dhcp4.conf
- Start the service:
sudo systemctl start kea-dhcp4
- Enable the service to always start at boot:
sudo systemctl enable kea-dhcp4
Add routes on your Windows workstation
To be able to log into your net1 and net2 hosts from your host, you need to add routes.
Run the following command in Powershell as administrator to add a route to net1:
New-NetRoute -DestinationPrefix "172.26.20.0/27" -InterfaceIndex $index -NextHop 10.26.20.100
where $index is the interface index of your Host-Only Ethernet Adapter #2 (hint: run Get-NetAdapter to find out the index value)
For convenience, you may also update your ./ssh/config file with login credentials for web and ws1.
macOS users
If you are on a mac, you may need to do a bit of internet search to find out how to add routes permanently on your system.
This blog post might provide answers (I can't guarantee that it works on all mac versions)
Troubleshooting
- Before starting the service, ensure there are not syntax errors by running:
sudo kea-dhcp4 -t /etc/kea/kea-dhcp4.conf. - Ensure the subnet declarations in your configuration files match those in your topology.
- Check service status:
systemctl status kea-dhcp4 - To check logs messages while the service is running:
journalctl -u kea-dhcp4