IPv4 Static Router
This activity creates statically configured routing in r1 and r2. These routers are placed in an inter-network hierarchy and traffic is observed as it is routed between the networks.
Deliverable
Setup
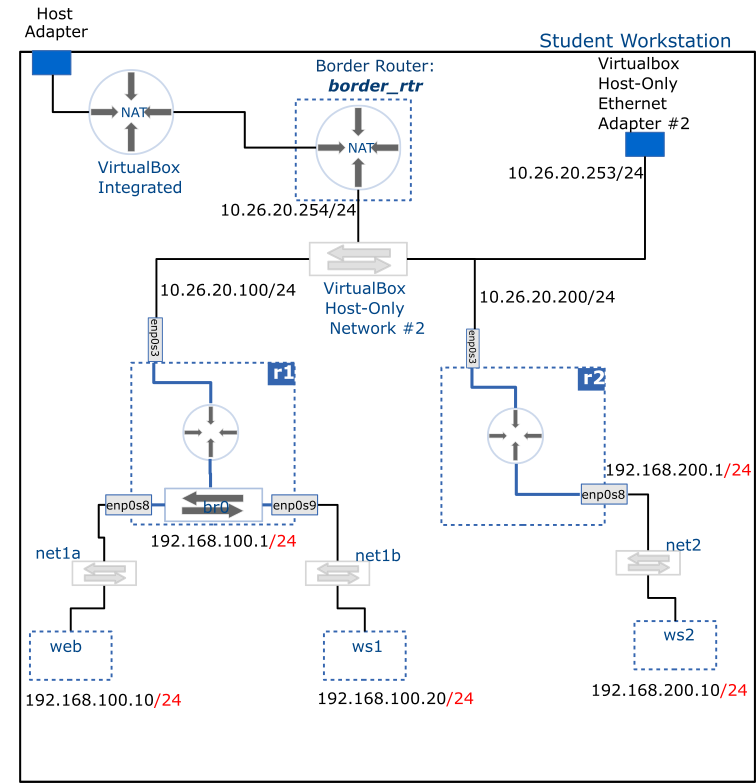
Three distinct IP networks need to exist by the end of the activity.
- Host-Only Network #2. Network Address: 10.26.20.0/24
- net1 (
net1a&net1bjoined by the bridge in r1). Network Address: 192.168.100.0/24 - net2. Network Address: 192.168.200.0/24
The following VMs will need to exist:
- border_rtr: imported as an appliance in the previous milestone
- r1: created in the previous milestone
- r2: created in the previous milestone
- web: created in the previous milestone
- ws1: created in the previous milestone
- ws2: newly created VM that is a linked clone of centos_8_base
- ws3: (optional) newly created VM that is a linked clone of centos_8_base
Attached to Host-Only Network #2 are the following VM's:
- border_rtr
- r1
- r2
Attached to the net1a network are the following VM's:
- r1
- web
Attached to the net1b network are the following VM's:
- r1
- ws1
net1
Note that net1a and net1b, though initially distinct networks, are now part of the same broadcast domain (i.e. same LAN) thanks to the bridge configured in r1.
Attached to the net2 network are the following VM's:
- r2: An additional Paravirtualized Network Adapter (virtio-net) will need to be added to this device. Ensure it is connected to an internal network named net2
- ws2: (linked clone based on the centos_8_base image; should have a single network adapter attached to net2 network)
- ws3 (Optional) (linked clone based on the centos_8_base image; should have a single network adapter attached to net2 network)
Router Configuration
Configuration steps:
- IP configuration of router interfaces:
enp0s3andbr0for r1,enp0s3andenp0s8for r2 - Enable IP forwarding
- Configure routes
You will need to use the NetworkManager through the nmcli/nmtui tools to create permanent configuration in the two routers and associated hosts.
It is perhaps easier to complete the following steps using the nmtui tool, but if you prefer working on the command line, a command reference for nmcli can be found under command hints heading at the bottom of this section:
Configuring r1
-
Start by detaching the
enp0s3interface from the bridge. The quickest way to do this would be to first delete theenp0s3configuration. The following command will do it:sudo nmcli con delete enp0s3At this point, the bridge will be left in control of the remaining two interfaces, i.e.
enp0s8andenp0s9.Then run the following command to create a new configuration for the
enp0s3interface:sudo nmcli con add type ethernet con-name enp0s3 ifname enp0s3Now you are ready to proceed with the next steps.
-
Using the nmtui or nmcli tools, edit the
enp0s3IP configuration as follows:- Switch from Automatic to Manual configuration
- In the IP address field, enter: 10.26.20.100/24
- In the Gateway field, enter: 10.26.20.254
- Select the Edit button next to the Routing tab, and enter a destination and next-hop values for the net2 subnet (you should understand what that means at this point)
- Save your changes and proceed to the next step
-
Edit the bridge IP configuration as follows:
- Switch from Automatic to Manual configuration
- In the IP address field, enter: 192.168.100.1/24
- Save your changes and proceed to the next step
-
Re-activate both the
enp0s3and the bridge interfaces -
Enable IP forwarding (see the note at the end of this section)
Configuring r2
-
Before going any further, ensure you have enabled a second adapter and attached it to an internal network named net2 as described in the setup notes above
-
Using the
nmtuiornmclitools, edit theenp0s3IP configuration as follows:- Switch from Automatic to Manual configuration
- In the IP address field, enter: 10.26.20.200/24
- In the Gateway field, enter: 10.26.20.254
- Select the Edit button next to the Routing tab, and enter a destination and next-hop values for the net1 subnet (you should understand what that means at this point)
- Save your changes and proceed to the next step
-
Edit the
enp0s8IP configuration as follows:- Switch from Automatic to Manual configuration
- In the IP address field, enter: 192.168.200.1/24
- Save your changes and proceed to the next step
-
Re-activate both the
enp0s3and theenp0s8interfaces -
Enable IP forwarding (see the note at the end of this section)
Enabling IP Forwarding
IP forwarding is the mechanism by which a host takes packets coming through one interface and forward them out through another interface. This is not enabled by default. To enable it, proceed as follows:
- Using a text editor such as Vim or nano, open the following file: /etc/sysctl.conf and add the following line at the bottom of it (this requires root privileges, i.e. sudo):
net.ipv4.ip_forward = 1
Run the following command to activate the changes:
sudo sysctl --system
nmcli command reference
Delete a connection:
sudo nmcli con delete [connection_name]
Create connection and configure IP:
sudo nmcli con add type ethernet con-name [connection_name] ifname [interface_name] ipv4.addresses [IP]/[cidr] ipv4.method manual ipv4.gateway [GATEWAY_IP] +ipv4.routes "[network_id] [gateway]"
The previous command can be broken down into multiple steps using the nmcli con modify command:
Configure default route:
sudo nmcli con modify [connection_name] ipv4.gateway [GATEWAY_IP]
Configure routes:
sudo nmcli con modify [connection_name] +ipv4.routes "[network_id] [gateway]"
Save changes:
sudo nmcli con reload
Host Configuration
IP configuration for web, ws1, ws2, and optionally ws3 is done in a similar fashion. So the steps provided below apply to all of them, but pay attention to the different values for each:
- Before going any further, ensure ws2 (and optionally ws3) exist and are attached to the net2 network as described in the setup note above.
- Using the
nmtui/nmclitools, edit theenp0s3IP configuration as follows:
- Switch from Automatic to Manual configuration
- In the IP Address field, enter:
- web: 192.168.100.10/24
- ws1: 192.168.100.20/24
- ws2: 192.168.200.10/24
- ws3: 192.168.200.20/24 (this is optional)
- In the Gateway field, enter:
- web and ws1: 192.168.100.1
- ws2 and ws3: 192.168.200.1
- Save the changes and re-activate the interface.
Troubleshooting
- Verify that links are active:
ip link show - Verify IP address on interfaces:
ip addr - Verify routing configuration:
ip route show(this is also how you find the default gateway for a host) - Test connectivity and routing (you may also use
ping):- In web:
sudo traceroute -I 192.168.100.1 - In web:
sudo traceroute -I 10.26.20.100 - In web:
sudo traceroute -I 10.26.20.200 - In web:
sudo traceroute -I 192.168.200.1 - In web:
sudo traceroute -I 192.168.200.10 - In ws2: do the reverse of the previous traces
- In web:
After verifying that everything works correctly, submit your report to the milestone's dropbox folder.